Cloudflare Tunnels as a Reverse Proxy
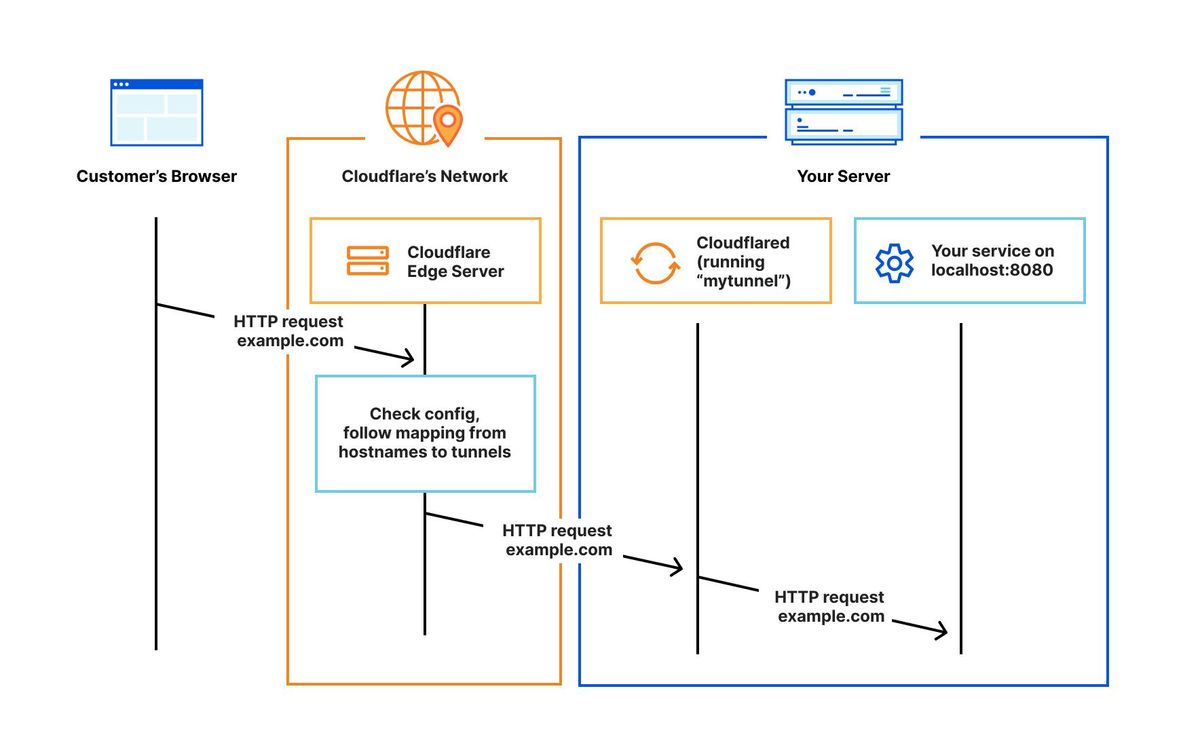
Cloudflare is an extremely powerful tool that enables you to host a website as a series of separate web apps instead of using a reverse proxy and opening ports in your firewall. Part of their free service offerings is a service called Cloudflare Tunnels. This service allows you to run all web requests through a service managed on your server connected to a Cloudflare VPS. This protects you from various attacks, but most importantly conceals your WAN IP address so possible hackers don't have direct access to your network.
My rationale behind using this was simply because for my domain name (spooner.network) it is extremely difficult to set up internal SSL certificates via reverse proxy. Let's Encrypt doesn't support the .network address and ZeroSSL doesn't provide wildcard certificates for free. This would mean that using any reverse proxy (NGINX, Caddy, Træfɪk) would leave my webapps unsecured. I'm already using Cloudflare as my DNS provider so I was confident that they would be able to provide me proper end-to-end SSL certs.
Setting Up Cloudflare Tunnels
1. Setting up Cloudflare Tunnels is extremely easy. The first step is to register your domain name with Cloudflare and use it as your DNS provider. This allows them to automatically add DNS entries for any tunnel hostnames you want.
2. Once Cloudflare is your DNS provider, create an account with Cloudflare teams and access their Zero Trust Dashboard. This is where you'll create tunnels and manage access.
3. Under Access > Tunnels create a new tunnel and follow the directions to install and run a connector on your server.
4. Once the connector is installed and the tunnel is running you can begin to add hostnames. Navigate to the public hostname tab and Add a Public Hostname. The subdomain option will be the CNAME of your DNS entry, for example, your homepage should be either blank or www and additional services should have a descriptive subdomain. My nexcloud server's subdomain is cloud. Then you select your domain from the dropdown list. Now configure the service section. Unless you are already running a reverse proxy the Type should be HTTP and the URL should be localhost:[Application Port#].
5. Once you save the hostname a DNS entry should be automatically created and in a few minutes, you should be able to reach your web app on subdomain.domain.
Adding Authentication to Your Webapps
1. Cloudflare also allows adding different authentication providers to your webapps to improve security further. Under settings in the Zero Trust Dashboard, there is a section labeled authentication. Under Login methods select Add new. The next screen will prompt you to select an identity provider from a list.
2. Choose one or more identity providers and configure them as shown in the step-by-step instructions.
3. Now navigate to Access>Applications in the Zero Trust Dashboard and choose Add an Application. On the next screen select Self-hosted and enter the subdomain and domain you added in the previous steps. Finally, under policies add a new policy with the action allow and the selector emails. Add in the emails of accounts you want to have access to your webapp.
4. Now Cloudflare will prompt users to sign in via the providers you configured and verify that they are on the allowed emails list.